Tmux教程
Cheat Sheet
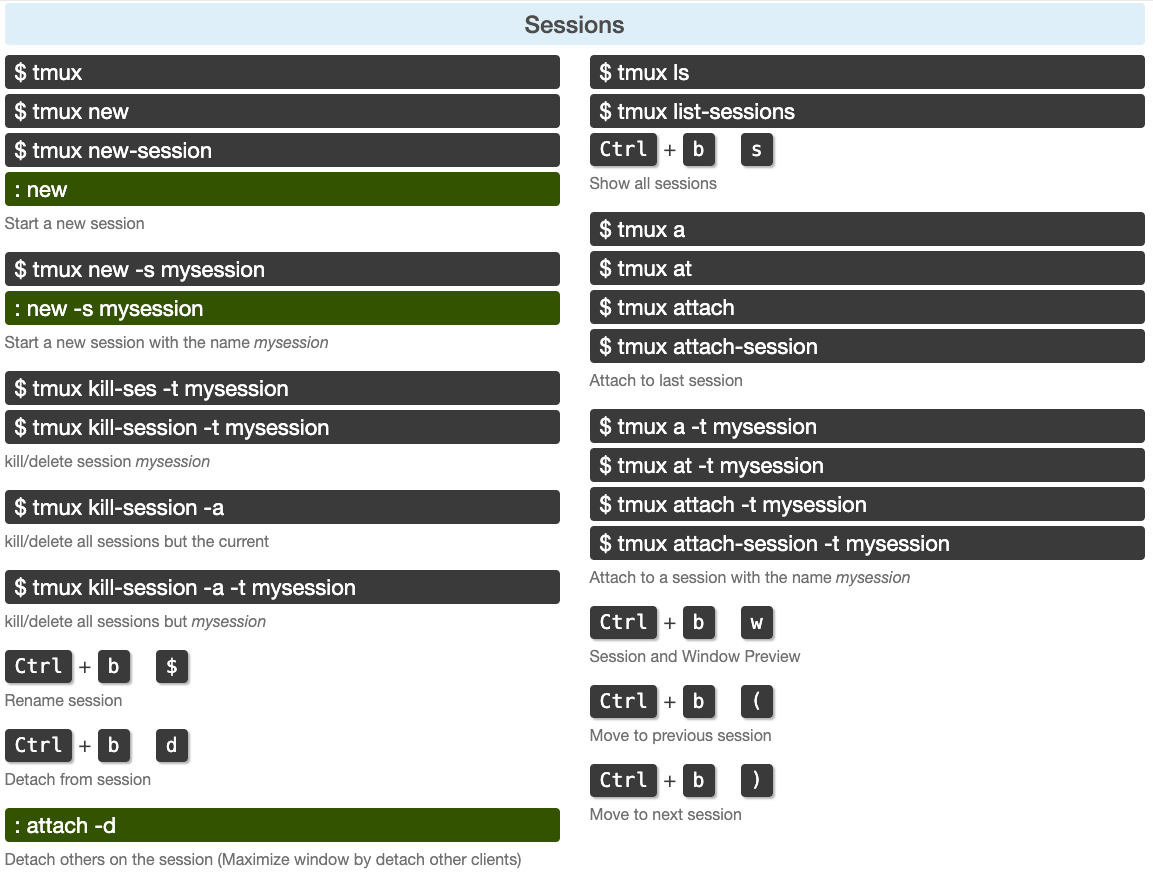
Session
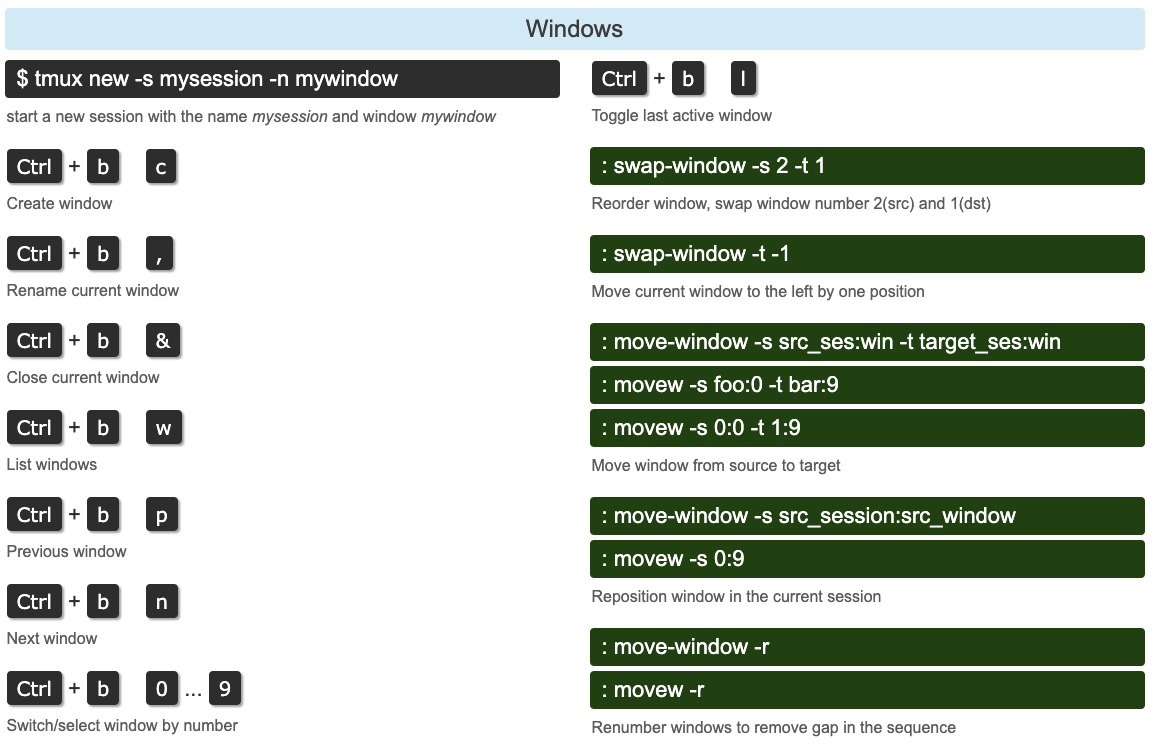
Windows
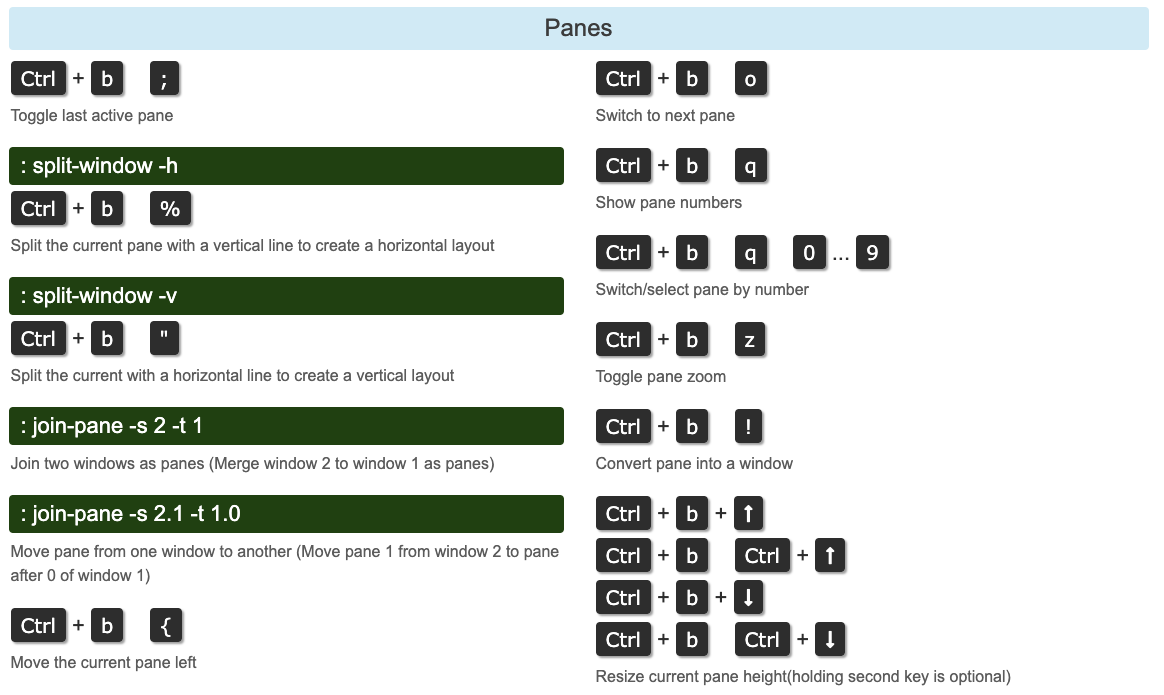
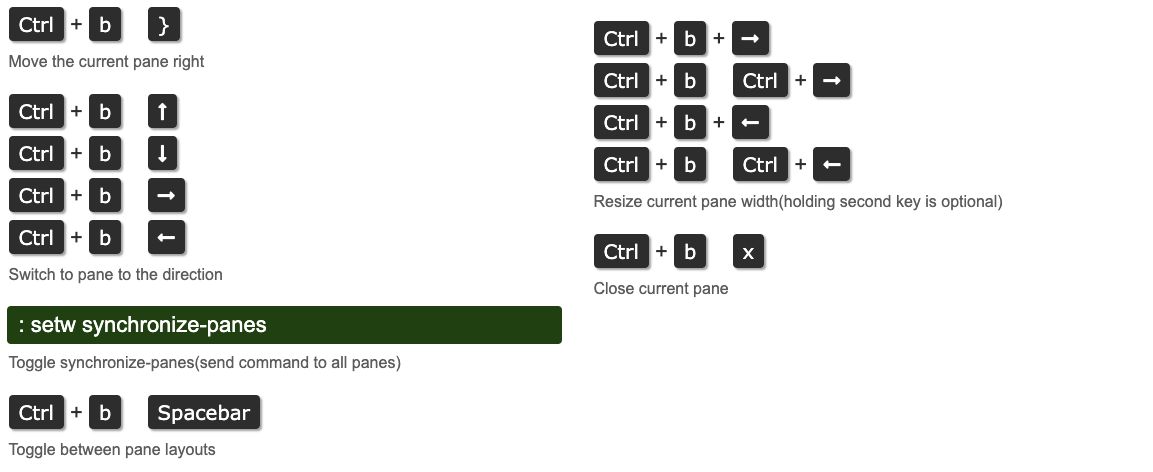
Panes
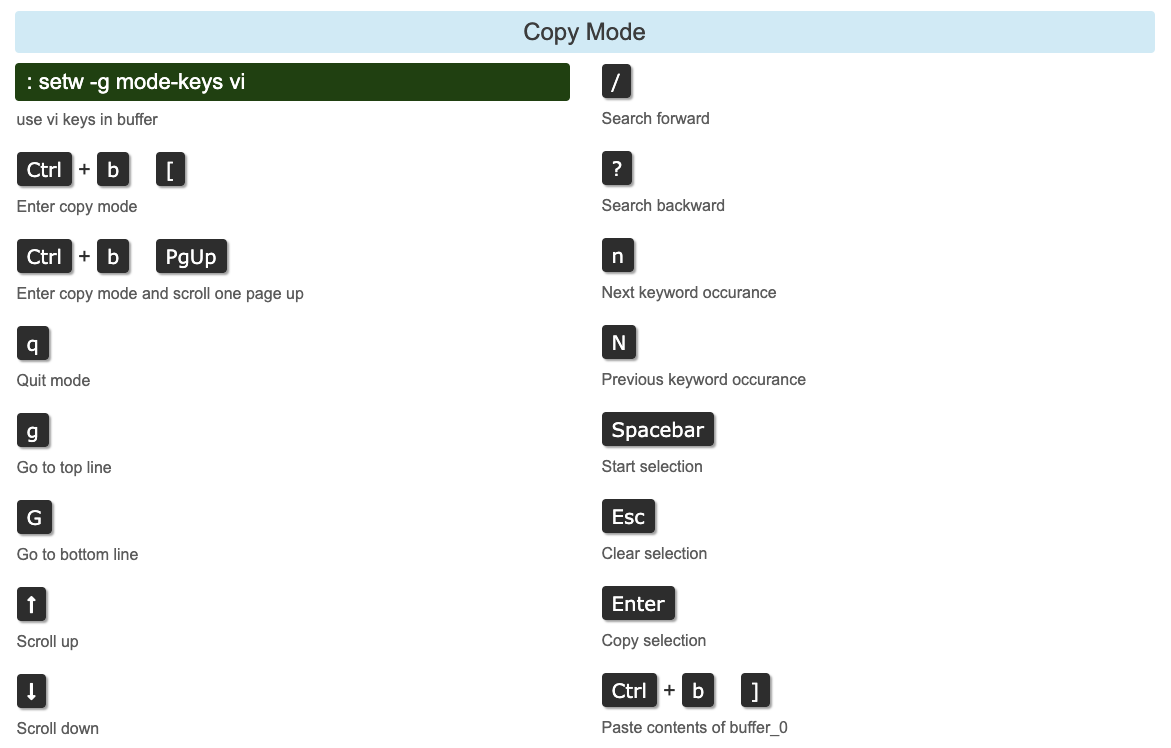
Copy Mode
Misc
Q&A
How to detach a nested tmux session?
CTRL+B CTRL+B D
The first CTRL+B is interpreted by your local tmux (because it is the first to see all your keystrokes). The second CTRL+B is a command that causes your local tmux to send a CTRL+B to its active pane; this generated CTRL+B arrives at the remote tmux. The D passes through the local tmux unchanged; when it gets to the remote tmux it triggers the detach command.
- You type
CTRL+B.
Your local tmux interprets it as the prefix key; nothing is sent to the processes running under the local tmux. - You type
CTRL+B.
Your local tmux has it bound to thesend-prefixcommand.- Your local tmux sends a CTRL+B to the process running in the active pane (ssh).
- ssh forwards it (through sshd, etc.) to the process running on the remote end (remote tmux).
Your remote tmux interprets it as the prefix key; nothing is sent to the processes running under the remote tmux.
- You type
D.
Your local tmux passes it through normally (since the second CTRL+B finished a full command key sequence for the local tmux).
Your remote tmux has it bound todetach-client; it detaches the active client.
This is the same as when you need to send a CTRL+B to any program running inside a tmux session. If you wanted to send CTRL+B to your normal shell (e.g. because your shell is using Emacs-style editing where CTRL+B is backward-char (and you dislike using the arrow keys)) you would need to use CTRL+B CTRL+B to get a single CTRL+B to the shell.
Another way to do it without worrying about the keybindings making it to the right tmux instance is to type tmux detach in the remote tmux session.
Source: How to detach a tmux session that itself already in a tmux? - Super User
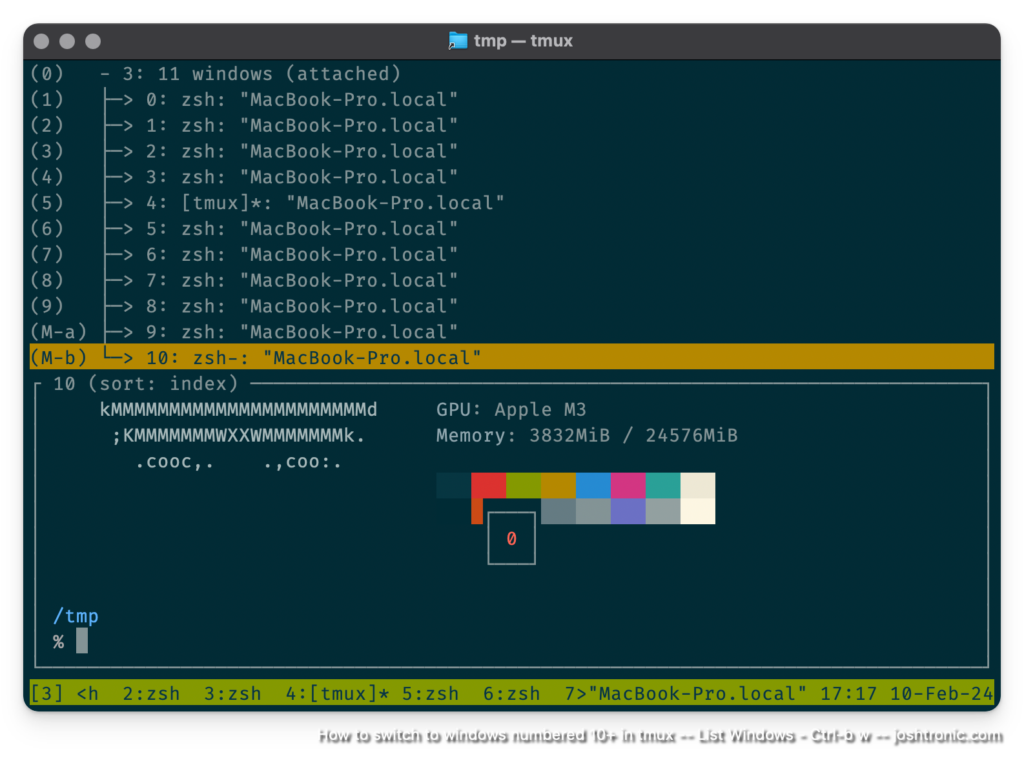
Switching to tmux windows numbered 10 and above
Cycle through tmux windows
When this happens, switching with Ctrl+b 0-9 stops being a thing. This makes getting back to these higher numbered windows a bit of a chore.
First, you could use Ctrl+b n to move to the next window in tmux. It gets the job done. But, it can be tedious if you’re trying to say go from window 1 to window 20. You could always jump to window 9 and start from there.
Jump to a specific tmux window
Another method would be to use Ctrl+b ' (single quote), which will prompt you for the index of the window. You can use this method to jump to any window, by its index, not just the windows numbered 10+.
Both of these method are sufficient enough if you aren’t working with many windows numbered 10+. If you’re like me, you try to avoid those higher numbered windows. This methods ends up being more than enough to get back to a window so you can then close it.
Browse tmux windows
Let’s say you’re a maniac that can actually keep more than 10 windows open and straight in your head. There’s a better way to navigate between those higher numbered windows.
Using Ctrl+b w will open up a list of your open windows, and you can cycle through them with a preview and pick which one you’d like to jump to:
Source: Switching to tmux windows numbered 10 and above - Josh Sherman (joshtronic.com)
tmux 介绍
tmux 是一个在终端中运行的程序,并允许在其中运行多个其他终端程序。
会话、窗口和面板
在了解 tmux ,我们需要了解三个概念:会话、窗口与面板。简单解释就是:我们打开一个终端,就叫创建一个会话,同时会在会话中打开一个窗口。经常我们都是一个窗口,然后在里面输入 Linux 命令进行操作,如果此时需要连多台服务器,或者做多个不同目录下的操作,我们就需要开多个窗口,而 tmux 就是解决这一痛点,它可以让我们在一个窗口下开多个面板,进行不同的操作。也就是说一个会话可以打开多个个窗口,一个窗口可以有多个面板。
In summary:
- Programs run in terminals in panes, which each belong to one window.
- Each window has a name and one active pane.
- Windows are linked to one or more sessions.
- Each session has a list of windows, each with an index.
- One of the windows in a session is the current window.
- Sessions are attached to one or more clients, or are detached (attached to no clients).
- Each client is attached to one session.
交互式使用tmux
创建新会话
tmux new -s mysession
-s参数指定会话名字
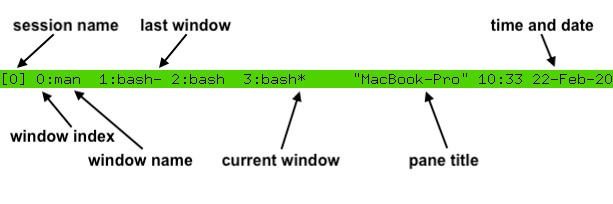
状态栏
连接 tmux 客户端时,它会在屏幕的底部显示一个状态行。默认情况下为绿色
前缀键
The default prefix key is C-b, which means the Ctrl key and b. In tmux, modifier keys are shown by prefixing a key with C- for the control key, M- for the meta key (normally Alt on modern computers) and S- for the shift key. These may be combined together, so C-M-x means pressing the control key, meta key and x together.
When the prefix key is pressed, tmux waits for another key press and that determines what tmux command is executed. Keys like this are shown here with a space between them: C-b c means first the prefix key C-b is pressed, then it is released and then the c key is pressed. Care must be taken to release the Ctrl key after pressing C-b if necessary - C-b c is different from C-b C-c.
帮助键
Every default tmux key binding has a short description to help remember what the key does. A list of all the keys can be seen by pressing C-b ?
命令提示符
tmux has an interactive command prompt. This can be opened by pressing C-b : and appears instead of the status line
连接和分离会话
tmux attach -t mysession
-d分离附加到会话的任何其他客户端:
tmux attach -dt mysession
显示会话列表
The list-session command (alias ls) shows a list of available sessions that can be attached. This shows four sessions called 1, 2, myothersession and mysession:
$ tmux ls
1: 3 windows (created Sat Feb 22 11:44:51 2020)
2: 1 windows (created Sat Feb 22 11:44:51 2020)
myothersession: 2 windows (created Sat Feb 22 11:44:51 2020)
mysession: 1 windows (created Sat Feb 22 11:44:51 2020)
终止所有tmux会话
在任意会话的命令提示符下,输入kill-server就会把所有的tmux会话终止,慎用!
kill-server
创建新窗口
A new window can be created in an attached session with the C-b c key binding which runs the new-window command. The new window is created at the first available index - so the second window will have index 1. The new window becomes the current window of the session.
If there are any gaps in the window list, they are filled by new windows. So if there are windows with indexes 0 and 2, the next new window will be created as index 1.
:neww -dn mynewwindow
-d标志创建窗口,但不使其成为当前窗口-n允许为新窗口指定名称。例如,使用命令提示符创建一个调用mynewwindow的窗口,而不使其成为当前窗口
-t 标志指定窗口的目标。命令目标具有特殊的语法,但对于 new-window 简单的使用,只需提供窗口索引就足够了。这将在索引 999 处创建一个窗口:
:neww -t 999
可以在新窗口中运行的命令,其方式与 new-window 相同 new-session 。例如,要创建一个运行 top(1) 的新窗口:
:neww top
拆分窗口
通过拆分窗口来创建面板。这是使用默认情况下绑定到两个键的 split-window 命令完成的:
C-b %将当前窗格水平拆分为两个窗格,生成两个彼此相邻的窗格,一个在左侧,一个在右侧。C-b "将当前窗格垂直拆分为两个,生成两个窗格,一个在另一个之上。
split-window has several useful flags:
split-window 有几个有用的标志:
-hdoes a horizontal split and-va vertical split.
-h执行水平拆分和-v垂直拆分。-ddoes not change the active pane to the newly created pane.
-d不会将活动窗格更改为新创建的窗格。-fmakes a new pane spanning the whole width or height of the window instead of being constrained to the size of the pane being split.
-f创建一个跨越窗口的整个宽度或高度的新窗格,而不是限制为要拆分的窗格的大小。-bputs the new pane to the left or above of the pane being split instead of to the right or below.
-b将新窗格放在要拆分的窗格的左侧或上方,而不是放在右侧或下方。
A command to be run in the new pane may be given to split-window in the same way as new-session and new-window.
要在新窗格中运行的命令可以 split-window 采用与 和 new-window 相同的 new-session 方式给出。
切换窗口
There are several key bindings to change the current window of a session:
C-b 0更改为窗口 0,更改为窗口 1,C-b 1直至窗口 9 的窗口C-b 9。C-b '提示输入窗口索引并更改该窗口。C-b n按编号更改为窗口列表中的下一个窗口。因此,在窗口 1 中按 When 将C-b n更改为窗口 2(如果存在)。C-b p按编号更改窗口列表中的上一个窗口。C-b l更改为最后一个窗口,即当前窗口之前的最后一个窗口。
These are all variations of the select-window command.
这些都是命令的 select-window 变体。
更改活动面板
The active pane can be changed between the panes in a window with these key bindings:
C-b Up,C-b Down,C-b LeftandC-b Rightchange to the pane above, below, left or right of the active pane. These keys wrap around the window, so pressingC-b Downon a pane at the bottom will change to a pane at the top.C-b q在窗格顶部打印窗格编号及其大小一小段时间。在数字键消失之前按其中一个数字键会将活动窗格更改为所选窗格,因此C-b q 1将更改为窗格编号 1C-b o按窗格编号移动到下一个窗格,并将该窗格与活动窗格交换,C-b C-o以便它们在窗口中交换位置和大小。
这些使用 select-pane 和 display-panes 命令。
窗格编号不是固定的,而是按其在窗口中的位置编号的窗格,因此,如果将数字为 0 的窗格与数字为 1 的窗格交换,则数字和窗格本身都会交换。
选择会话、窗口和窗格
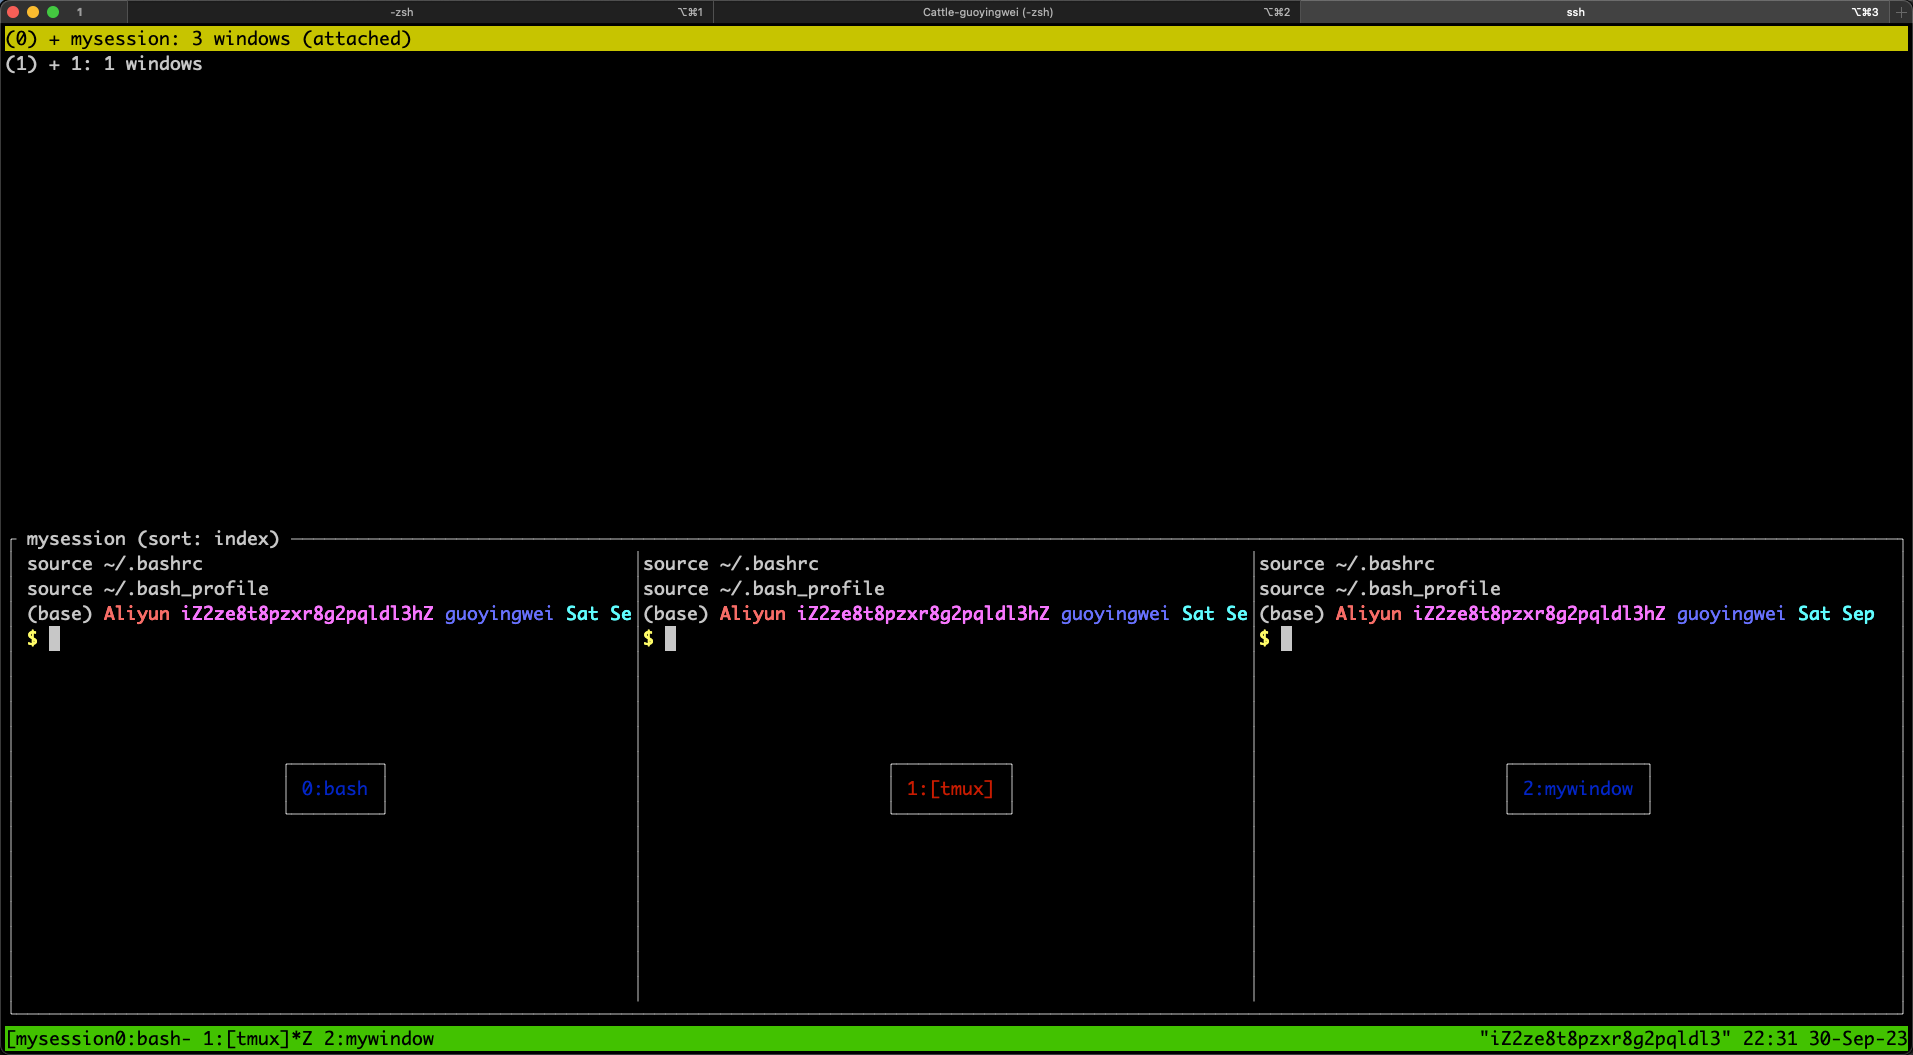
TMUX 包括一种模式,可以在其中从树中选择会话、窗口或窗格,这称为树模式。
它可用于浏览会话,窗口和窗格;更改附加的会话、当前窗口或活动窗格;杀死会话、窗口和窗格;或者通过标记命令一次将命令应用于多个命令。
进入树模式有两个键绑定: C-b s 开始仅显示会话和选择附加的会话; C-b w 从展开会话开始,以便显示窗口,并在附加会话中选择当前窗口。
树模式将窗口分为两部分:上半部分包含会话、窗口和窗格的树,下半部分包含每个窗格中光标周围区域的预览。
对于会话,预览会在尽可能多的窗口中显示活动窗格;对于窗户,尽可能多的窗格适合;对于窗格,仅选择选定的窗格。
用于控制树模式的键不需要前缀。可以使用 Up 和 Down 键导航列表。 Enter 对所选项目(它将成为附加的会话、当前窗口或活动窗格)的更改并退出模式。 Right 展开项目(如果可能) - 会话展开以显示其窗口,窗口以显示其窗格。 Left 折叠项目以隐藏任何窗口或窗格。 O 更改项目的顺序并 q 退出树模式。
树中的项目通过按 t 进行标记,通过再次按下 t 来取消标记。标记的项目以粗体显示,并在其名称后显示 * 。所有标记的项目都可以通过按 T 取消标记。可以通过按 来一起杀死标记的项目,或者通过按 X : 提示来应用所有标记的项目的命令。
树中的每个项目在行首的括号中都有快捷键。按此键将立即选择该项目(就像已选择并 Enter 按下一样)。前十项是 0 键, 9 之后 M-a M-z 是键。
这是树模式下可用的键列表,无需按前缀键:
| Key 钥匙 | Function 功能 |
|---|---|
Enter |
Change the attached session, current window or active pane 更改附加的会话、当前窗口或活动窗格 |
Up |
Select previous item 选择上一项 |
Down |
Select next item 选择下一项 |
Right |
Expand item 展开项目 |
Left |
Collapse item 折叠项目 |
x |
Kill selected item 杀死所选项目 |
X |
Kill tagged items 杀死标记的项目 |
< |
Scroll preview left 向左滚动预览 |
> |
Scroll preview right 向右滚动预览 |
C-s |
Search by name 按名称搜索 |
n |
Repeat last search 重复上次搜索 |
t |
Toggle if item is tagged 切换项目是否被标记 |
T |
Tag no items 不标记任何项目 |
C-t |
Tag all items 标记所有项目 |
: |
Prompt for a command to run for the selected item or each tagged item 提示为所选项目或每个标记的项目运行命令 |
O |
Change sort field 更改排序字段 |
r |
Reverse sort order 反向排序顺序 |
v |
Toggle preview 切换预览 |
q |
Exit tree mode 退出树模式 |
使用 choose-tree 命令激活树模式。
分离其它客户端
A list of clients is available by pressing C-b D (that is, C-b S-d). This is similar to tree mode and is called client mode.
每个客户端都显示在上半部分的列表中,包括其名称、附加的会话、大小以及上次使用的时间和日期;下半部分包含所选客户端的预览,其中包含尽可能多的状态行。
移动键和标签键与树模式相同,但其他键不同,例如,键 Enter 分离所选客户端。
以下是客户端模式下的键列表,没有与树模式相同的移动和标记键:
| Key 钥匙 | Function 功能 |
|---|---|
Enter |
Detach selected client 分离所选客户端 |
d |
Detach selected client, same as Enter 分离选定的客户端,与 Enter |
D |
Detach tagged clients 分离标记的客户端 |
x |
Detach selected client and try to kill the shell it was started from 分离选定的客户端并尝试终止它启动的 shell |
X |
Detach tagged clients and try to kill the shells they were started from 分离标记的客户端并尝试终止它们启动的 shell |
除了使用客户端模式之外,该 detach-client 命令还有一个 -a 标志,用于分离附加客户端以外的所有客户端。
终止会话、窗口或窗格
按下 C-b & 确认提示会终止(关闭)当前窗口。窗口中的所有窗格将同时被终止。 C-b x 仅终止活动窗格。这些命令绑定到 和 kill-window kill-pane 命令。
kill-session 命令将终止连接的会话及其所有窗口,并分离客户端。没有键 kill-session 绑定,但可以从命令提示符或树模式下的 : 提示符使用。
kill-server 直接终止tmux服务,慎用!
重命名会话与窗口
C-b $ 将提示为附加的会话输入新名称。这将使用命令 rename-session 。同样, C-b , 使用该 rename-window -t n new_name 命令提示输入当前窗口的新名称。
交换和移动
tmux allows panes and windows to be swapped with the swap-pane and swap-window commands.
为了便于交换,可以标记单个窗格。所有会话中都有一个标记的窗格。键绑定切换 C-b m 附加会话中当前窗口中的活动窗格是否为标记的窗格。 C-b M 完全清除标记的窗格,以便不标记任何窗格。标记的窗格由其边框的绿色背景显示,包含标记窗格的窗口在状态行中有一个 M 标志。
标记窗格后,可以使用命令 swap-pane 将其与当前窗口中的活动窗格交换,或者可以使用该 swap-window 命令将包含标记窗格的窗口与当前窗换。例如,使用命令提示符:
此外,还可以使用 C-b { 和 C-b } 键绑定与上方或下方的窗格交换窗格。
移动窗口使用 move-window 命令或 C-b . 键绑定。按下将 C-b . 提示输入当前窗口的新索引。如果给定索引中已存在窗口,则会显示错误。可以使用 -k 标志替换现有窗口 - 将窗口移动到索引 999:
:move-window -kt 999
如果窗口列表中存在间隙,则可以使用 -r 标志将索引重新编号 move-window 为 。例如,这会将窗口列表 0, 1, 3, 999 更改为 0, 1, 2, 3:
:movew -r
调整窗格大小和缩放窗格
Panes may be resized in small steps with C-b C-Left, C-b C-Right, C-b C-Up and C-b C-Down and in larger steps with C-b M-Left, C-b M-Right, C-b M-Up and C-b M-Down. These use the resize-pane command.
可以临时使单个窗格占用整个窗口 C-b z ,隐藏任何其他窗格。再次按下可将 C-b z 窗格和窗口布局恢复到原来的状态。这称为缩放和取消缩放。窗格已缩放的窗口在状态行中标有 。 Z 更改窗口中窗格的大小或位置的命令会自动取消缩放窗口。
窗口布局
窗口中的窗格可以自动排列成几个命名布局之一,这些布局可以在键绑定之间 C-b Space 旋转,也可以直接使用 C-b M-1 , C-b M-2 依此类推。
可用的布局包括:
| Name 名字 | Key 钥匙 | Description 描述 |
|---|---|---|
| even-horizontal 均匀水平 | C-b M-1 |
Spread out evenly across 均匀分布 |
| even-vertical 均匀垂直 | C-b M-2 |
Spread out evenly up and down 上下均匀分布 |
| main-horizontal 主水平 | C-b M-3 |
One large pane at the top, the rest spread out evenly across 顶部有一个大窗格,其余部分均匀分布在 |
| main-vertical 主垂直 | C-b M-4 |
One large pane on the left, the rest spread out evenly up and down 左侧有一个大窗格,其余窗格均匀地上下展开 |
| tiled 平铺 | C-b M-5 |
Tiled in the same number of rows as columns 平铺的行数与列相同 |
复制和粘贴
TMUX 有自己的复制和粘贴系统。复制的文本段称为粘贴缓冲区。使用复制模式复制文本,使用 输入 , C-b [ 最近复制的文本使用 粘贴到活动窗格中 C-b ] 。
粘贴缓冲区可以命名,但默认情况下,它们由 tmux 指定名称,例如 buffer0 或 buffer1 。像这样的缓冲区称为自动缓冲区,最多保留 50 个 - 一旦有 50 个缓冲区,当添加另一个缓冲区时,最旧的缓冲区将被删除。如果为缓冲区指定名称,则称为命名缓冲区;无论有多少命名缓冲区,都不会删除。
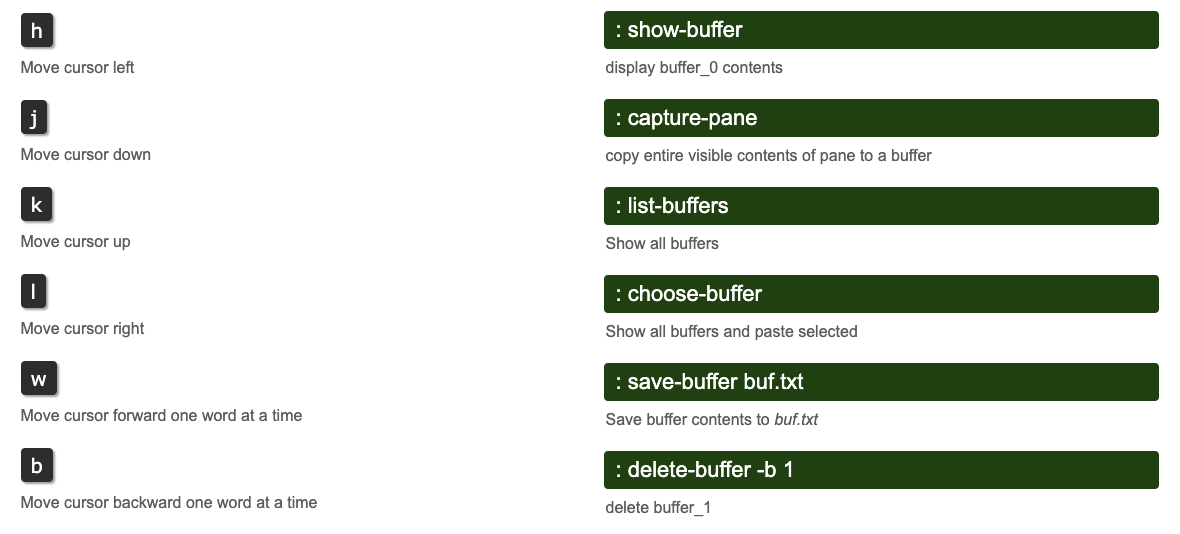
与命令提示符一样,复制模式使用类似于 emacs(1) 的键;但是,如果 OR VISUAL EDITOR 环境变量设置为包含 vi 的内容,则改用 vi(1) 样式的键。以下键是一些在复制模式下使用 emacs(1) 键的键:
| Key 钥匙 | Action 行动 |
|---|---|
Up, Down, Left, Right Up , , , Down Left Right |
Move the cursor 移动光标 |
C-Space |
Start a selection 开始选择 |
C-w |
Copy the selection and exit copy mode 复制所选内容并退出复制模式 |
q |
Exit copy mode 退出复制模式 |
C-g |
Stop selecting without copying, or stop searching 停止选择而不复制,或停止搜索 |
C-a |
Move the cursor to the start of the line 将光标移动到行首 |
C-e |
Move the cursor to the end of the line 将光标移动到行尾 |
C-r |
Search interactively backwards 以交互方式向后搜索 |
M-f |
Move the cursor to the next word 将光标移动到下一个单词 |
M-b |
Move the cursor to the previous word 将光标移动到上一个单词 |
复制某些文本后,可以使用缓冲区模式粘贴 C-b ] 最新的文本或粘贴较旧的缓冲区,并使用 . C-b = 缓冲区模式类似于客户端模式和树模式,并提供缓冲区列表及其内容的预览。除了树模式和客户端模式下使用的导航和标记键外,缓冲区模式还支持以下键:
| Key 钥匙 | Function 功能 |
|---|---|
Enter |
Paste selected buffer 粘贴所选缓冲区 |
p |
Paste selected buffer, same as Enter 粘贴所选缓冲区,与 Enter |
P |
Paste tagged buffers 粘贴标记的缓冲区 |
d |
Delete selected buffer 删除选定的缓冲区 |
D |
Delete tagged buffers 删除标记的缓冲区 |
A buffer may be renamed using the set-buffer command. The -b flag gives the existing buffer name and -n the new name. This converts it into a named buffer. For example, to rename buffer0 to mybuffer from the command prompt:
可以使用该 set-buffer 命令重命名缓冲区。该 -b 标志提供现有缓冲区名称和 -n 新名称。这会将其转换为命名缓冲区。例如,要从命令提示符重命名 buffer0 为 mybuffer :
:setb -bbuffer0 -nmybuffer
set-buffer can also be used to create buffers. To create a buffer called foo with text bar:
set-buffer 也可用于创建缓冲区。要创建用文本 bar 调用 foo 的缓冲区:
:setb -bfoo bar
load-buffer will load a buffer from a file:
load-buffer 将从文件加载缓冲区:
:loadb -bbuffername ~/a/file
set-buffer or load-buffer without -b creates an automatic buffer.
set-buffer 或不 load-buffer 创建 -b 自动缓冲区。
An existing buffer can be saved to a file with save-buffer:
现有缓冲区可以保存到文件中 save-buffer :
:saveb -bbuffer0 ~/saved_buffer
查找窗口和窗格
C-b f prompts for some text and then enters tree mode with a filter to show only panes where that text appears in the visible content or title of the pane or in the window name. If panes are found, only those panes appear in the tree, and the text filter: active is shown above the preview. If no panes are found, all panes are shown in the tree and the text filter: no matches appears above the preview.
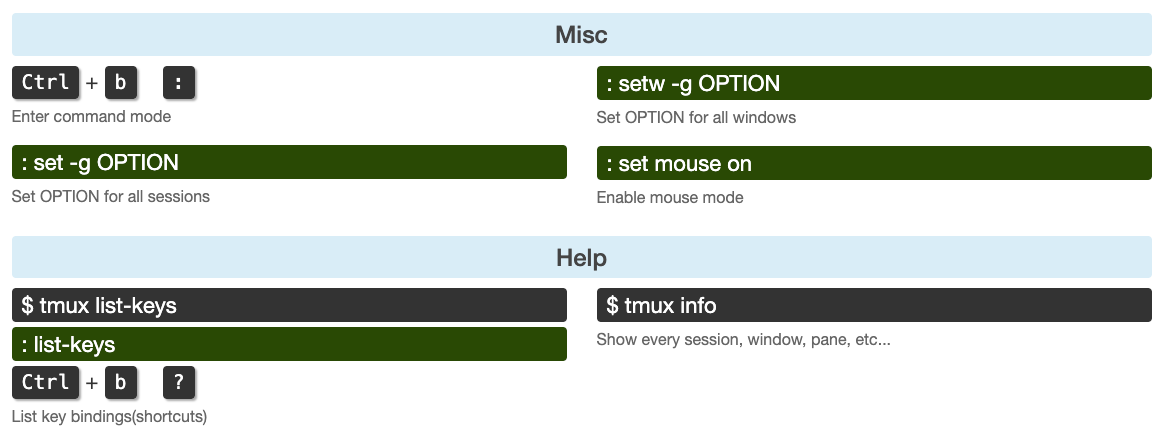
使用鼠标
tmux has rich support for the mouse. It can be used to change the active pane or window, to resize panes, to copy text, or to choose items from menus.
TMUX 对鼠标有丰富的支持。它可用于更改活动窗格或窗口、调整窗格大小、复制文本或从菜单中选择项目。
Support for the mouse is enabled with the mouse option; options and the configuration file are described in detail in the next section. To turn the mouse on from the command prompt, use the set-option command:
使用该 mouse 选项启用对鼠标的支持;选项和配置文件将在下一节中详细介绍。若要从命令提示符打开鼠标,请使用 set-option 以下命令:
:set -g mouse on
Once the mouse is enabled:
启用鼠标后:

- Pressing the left button on a pane will make that pane the active pane.
按窗格上的左按钮将使该窗格成为活动窗格。 - Pressing the left button on a window name on the status line will make that the current window.
在状态行上的窗口名称上按左键将使该窗口成为当前窗口。 - Dragging with the left button on a pane border resizes the pane.
在窗格边框上使用左键拖动可调整窗格大小。 - Dragging with the left button inside a pane selects text; the selected text is copied when the mouse is released.
在窗格中用左键拖动可选择文本;释放鼠标时,将复制所选文本。 - Pressing the right button on a pane opens a menu with various commands. When the mouse button is released, the selected command is run with the pane as target. Each menu item also has a key shortcut shown in brackets.
在窗格中按右键将打开一个包含各种命令的菜单。释放鼠标按钮时,将运行所选命令,并将窗格作为目标。每个菜单项还有一个显示在括号中的快捷键。 - Pressing the right button on a window or on the session name on the status line opens a similar menu for the window or session.
在窗口或状态行上的会话名称上按右键可为窗口或会话打开类似的菜单。
配置tmux
参考配置文件:
# -----------------------------------------------------------------------------
# Tmux 基本配置 - 要求 Tmux >= 2.3
# 如果不想使用插件,只需要将此节的内容写入 ~/.tmux.conf 即可
# -----------------------------------------------------------------------------

# C-b 和 VIM 冲突,修改 Prefix 组合键为 Control-Z,按键距离近
# set -g prefix C-z

set -g base-index         1     # 窗口编号从 1 开始计数
set -g display-panes-time 10000 # PREFIX-Q 显示编号的驻留时长,单位 ms
set -g mouse              on    # 开启鼠标
set -g pane-base-index    1     # 窗格编号从 1 开始计数
set -g renumber-windows   on    # 关掉某个窗口后,编号重排

setw -g allow-rename      off   # 禁止活动进程修改窗口名
setw -g automatic-rename  off   # 禁止自动命名新窗口
setw -g mode-keys         vi    # 进入复制模式的时候使用 vi 键位(默认是 EMACS)

# -----------------------------------------------------------------------------
# 使用插件 - via tpm
#   1. 执行 git clone https://github.com/tmux-plugins/tpm ~/.tmux/plugins/tpm
#   2. 执行 bash ~/.tmux/plugins/tpm/bin/install_plugins
# -----------------------------------------------------------------------------

setenv -g TMUX_PLUGIN_MANAGER_PATH '~/.tmux/plugins'

# 推荐的插件(请去每个插件的仓库下读一读使用教程)
# set -g @plugin 'seebi/tmux-colors-solarized'
set -g @plugin 'tmux-plugins/tmux-pain-control'
set -g @plugin 'tmux-plugins/tmux-prefix-highlight'
set -g @plugin 'tmux-plugins/tmux-resurrect'
set -g @plugin 'tmux-plugins/tmux-sensible'
# set -g @plugin 'tmux-plugins/tmux-yank'
set -g @plugin 'tmux-plugins/tpm'

# tmux-resurrect
set -g @resurrect-dir '~/.tmux/resurrect'

# tmux-prefix-highlight
set -g status-right '#{prefix_highlight} #H | %a %Y-%m-%d %H:%M'
set -g @prefix_highlight_show_copy_mode 'on'
set -g @prefix_highlight_copy_mode_attr 'fg=white,bg=blue'

# 初始化 TPM 插件管理器 (放在配置文件的最后)
run '~/.tmux/plugins/tpm/tpm'

# -----------------------------------------------------------------------------
# 结束
# -----------------------------------------------------------------------------
常用配置更改
其它功能
tmux has a large set of features and commands not mentioned in this document, many allowing powerful scripting. Here is a list of some that may be worth further reading:
- Alerts:
monitor-activity,monitor-bell,monitor-silence,activity-action,bell-actionand other options. - Options for individual session, windows and panes.
- Moving panes with
join-paneandbreak-pane. - Sending keys to panes with
send-keys. - The command prompt
history-fileoption. - Saved layout strings with
select-layout. - Command sequences (separated by
;):select-window; kill-window. - Configuration file syntax:
{},%ifand so on. - Mouse key bindings:
MouseDown1Paneand so on. - Locking:
lock-command,lock-after-timeand other options. - Capturing pane content with
capture-paneand piping withpipe-pane. - Linking windows: the
link-windowcommand. - Session groups: the
-tflag tonew-session. - Respawing window and panes with
respawn-windowandrespawn-pane. - Custom menus with the
display-menucommand and custom prompts withcommand-promptandconfirm-before. - Different key tables:
bind-keyand the-Tflag toswitch-client. - Empty panes: the
split-windowwith an empty command and-Itodisplay-message. - Hooks:
set-hookandshow-hooks. - Synchronization for scripts with
wait-for.